User’s Guide
Installation
To install the GeoServer Task Manager extension:
- Download the extension from the GeoServer Download
Page. The file name is called
geoserver-*-taskmanager-core-plugin.zip, where*is the version/snapshot name. For S3 support, also install the plugin with namegeoserver-*-taskmanager-s3-plugin.zip, where*is the version/snapshot name. - Extract this file and place the JARs in
WEB-INF/lib. - Perform any configuration required by your servlet container, and
then restart. On startup, Task Manager will create a configuration
directory
taskmanagerin the GeoServer Data Directory. You will be able to see the Task Manager configuration pages from the GeoServer WebGUI menu.
Server Configuration
Configuration Database & Clustering
By default, Task Manager will create a H2 database in its configuration
directory. This can be easily changed to any JDBC resource via the
taskmanager.properties file.
The configuration directory also contains a Spring configuration file
called taskManager-applicationContext.xml which allows more advanced
configuration.
TaskManager uses Quartz Scheduler. If you are running Task Manager in a clustered environment, you must configure Quartz to use a database as well as Task Manager. See the commented block in the Spring configuration and the Quartz documentation for further instructions. The database used by Quartz may be the same as the Task Manager configuration database.
Furthermore, a property should be added to the
taskmanager.properties file each of the nodes except for one:
batchJobService.init=false. This is necessary because otherwise all
of the nodes will attempt to load all of the same batches in to the
clustered quartz database at the same time at start-up, which is likely
to cause issues. This initialisation needs to happen only once for the
entire cluster.
Databases
Task Manager allows any number of databases to be used both as sources and targets for data transfer operations. These are configured via the Spring configuration file. Currently only PostGIS is fully supported, either via JNDI or directly via JDBC.
<bean class="org.geoserver.taskmanager.external.impl.PostgisDbSourceImpl">
    <property name="name" value="mypostgisdb"/>
    <property name="host" value="hostname" />
    <property name="db" value="dbname" />
    <!-- optional --> <property name="schema" value="schema" />
    <property name="username" value="username" />
    <property name="password" value="password" />
</bean>
<bean class="org.geoserver.taskmanager.external.impl.PostgisJndiDbSourceImpl">
    <property name="name" value="mypostgisjndidb" />
    <property name="jndiName" value="java:/comp/env/jdbc/my-jndi-source" />
    <!-- optional --> <property name="schema" value="schema" />
    <!-- optional, if database has different jndi name on target geoserver servers -->
     <property name="targetJndiNames">
     <map>
        <entry key="mygs" value="java:/comp/env/jdbc/my-jndi-source-on-mygs" />
     </map>
    </property>
</bean>
There is also support for Informix, but it only works as a source database (not for publishing).
<bean class="org.geoserver.taskmanager.external.impl.InformixDbSourceImpl">
    <property name="driver" value="com.informix.jdbc.IfxDriver"/>
    <property name="connectionUrl" value="jdbc:informix-sqli://informix-server:1539" />
    <property name="username" value="username" />
    <property name="password" value="password" />
</bean>
External GeoServers
Task Manager allows any number of external geoservers to be used as targets for layer publications. These are configured via the Spring configuration file.
<bean class="org.geoserver.taskmanager.external.impl.ExternalGSImpl">
    <property name="name" value="mygs"/>
    <property name="url" value="http://my.geoserver/geoserver" />
        <property name="username" value="admin" />
        <property name="password" value="geoserver" />
</bean>
File Services
File Services are used to upload and access files such as raster layers. They are configured via the Spring configuration file.
Regular File Service
Regular file services provide support for rasters that are stored on the hard drive.
<bean class="org.geoserver.taskmanager.fileservice.impl.FileServiceImpl">
    <property name="rootFolder" value="/tmp"/>
    <property name="name" value="Temporary Directory"/>
</bean>
S3 File Service
S3 File Services provide support for rasters that are stored on an S3 compatible server.
They do not need to be configured via the application context, but are
taken from the properties file provided via the property
s3.properties.location (see S3
DataStore.
A service will be created for each service and each bucket. We must add
one line per alias to the s3.properties file:
alias.s3.rootfolder=comma,separated,list,of,buckets
The above example will create five s3 file services: alias-comma, alias-separated, alias-list, alias-of and alias-buckets.
Security
Each configuration and each independent batch is associated with a workspace in GeoServer (when the workspace field is empty, it is automatically associated with the default workspace in geoserver). The configuration or batch takes its security permissions directly from this workspace.
- If the user has reading permissions on the workspace, they may view the configuration or batch.
- If the user has writing permissions on the workspace, they may run the batch or the batches in the configuration.
- If the user has administrative permissions on the workspace, they may edit the configuration/batch.
Graphical User Interface
Currently GeoServer Task Manager can only be configured and operated from the GeoServer WebGUI.
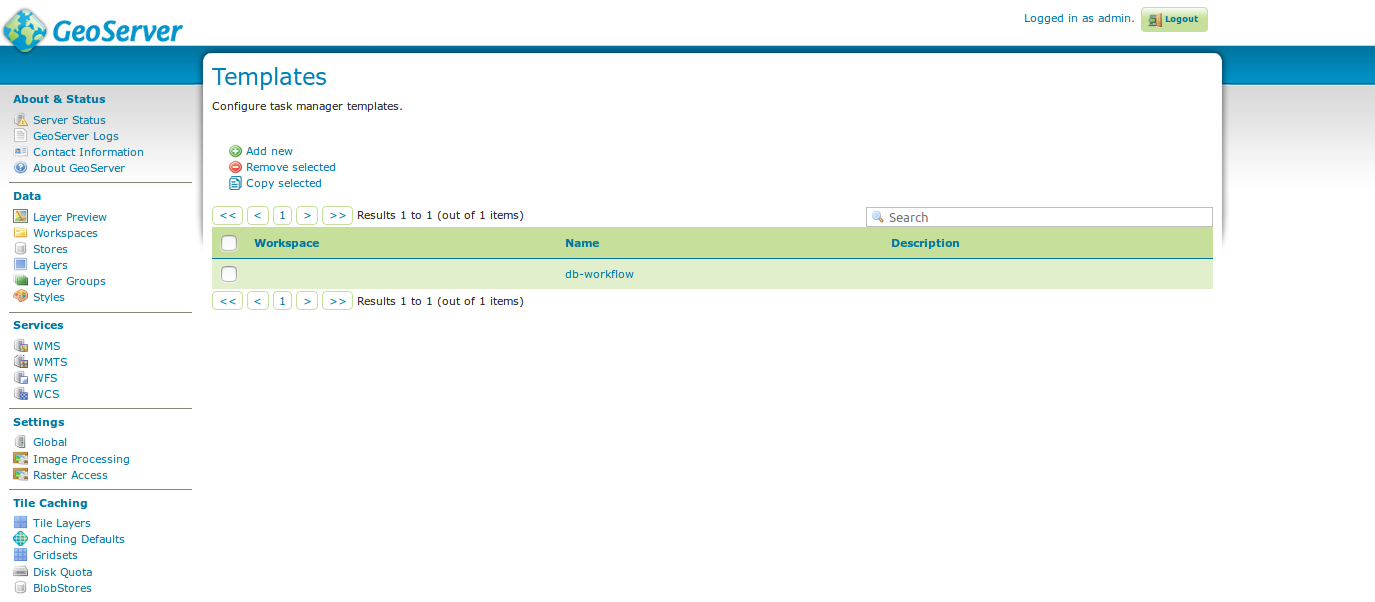
Templates
From the templates page, new templates can be created (or copied from existing templates), existing templates can be edited and removed.
templates
Once you open a new or existing template, attributes, tasks and batches
can be edited. The attribute table adjusts automatically based on the
information in the tasks table; and only the values must be filled in.
In the task table, the name and parameters of each task can be edited,
and new tasks can be created. Batches can be created and edited from
here as well, however the template must exist in order to be able to do
that (in case of a new template, you must click apply once before
you can create new batches). New tasks must also be saved (again, via
the apply button) before they can be added to a batch.
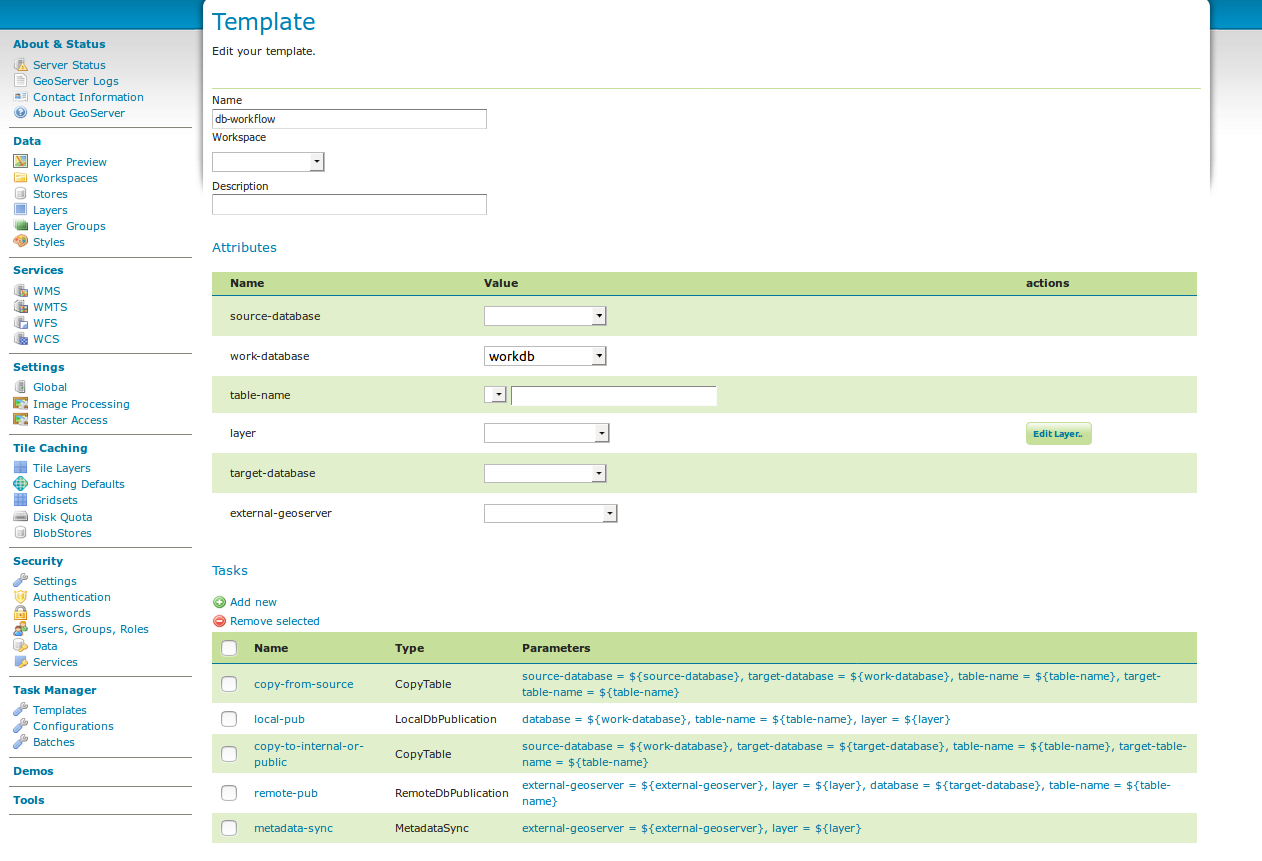
template db workflow
Configurations
From the configurations page, new configurations can be created from scratch or from templates (or copied from existing configurations), existing configurations can be edited and removed.

configurations
When removing a configuration, you have to option to do a clean-up, which will attempt to remove all resources (database tables, files, layers) that were created by (tasks of) this configuration. If this (partially) fails, the configuration will still be removed and the user will be notified.
Once you open a new or existing configuration, attributes, tasks and batches can be edited.
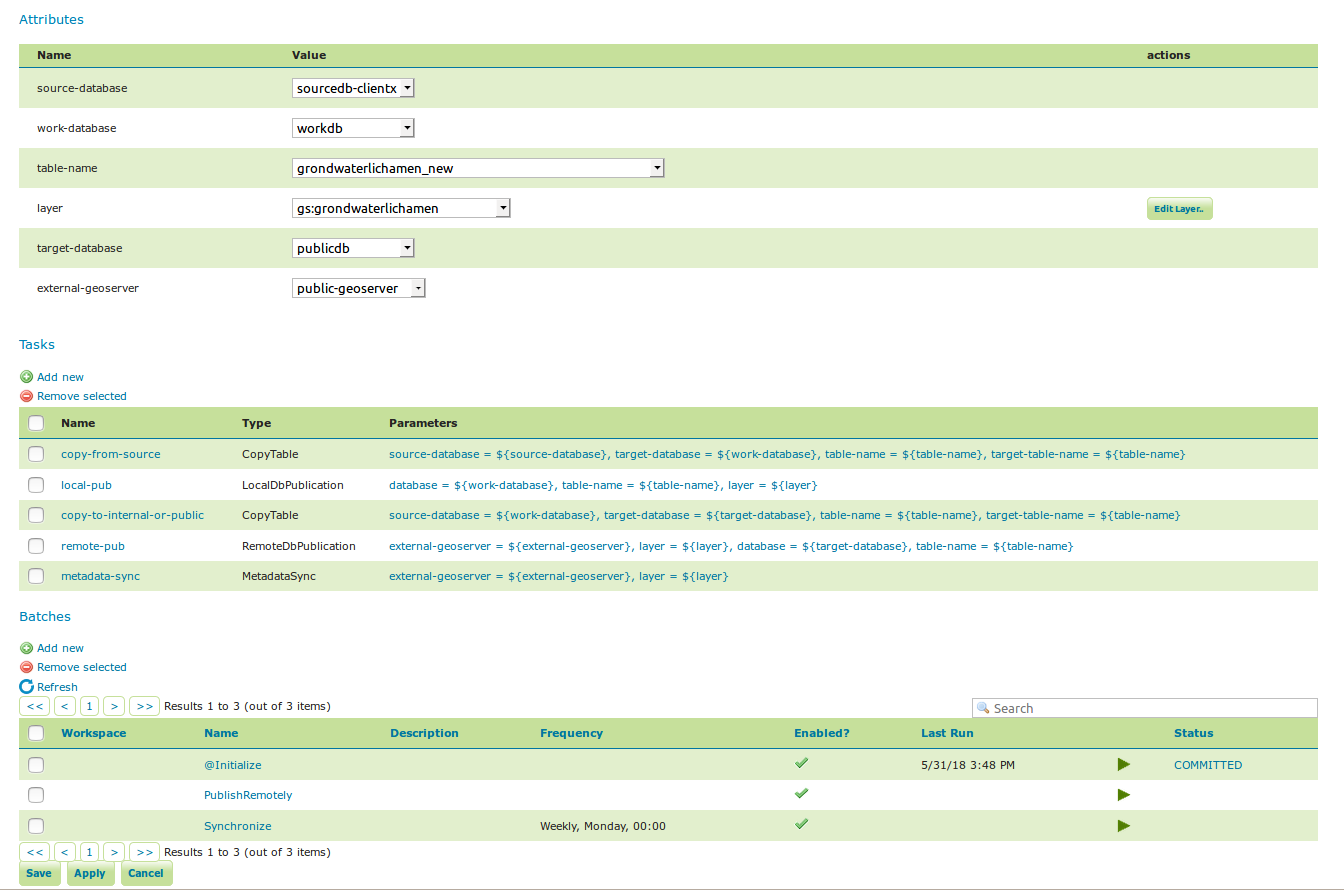
workflow config 2
The attribute table adjusts automatically based on the information in the tasks table; and only the values must be filled in. In the task table, the name and parameters of each task can be edited, and new tasks can be created. Tasks can only be removed if they are not part of a batch any longer. Batches can only be removed if they are not running anywhere. When removing a task, you have to option to do a clean-up, which will attempt to remove all resources (database tables, files, layers) that were created by this task. If this (partially) fails, the task will still be removed and the user will be notified.
Batches can be created and edited from here as well, however the
configuration must exist in order to be able to do that (in case of a
new configuration, you must click apply once before you can create
new batches). New tasks must also be saved (again, via the apply
button) before they can be added to a batch. In case that the
conditions are met, batch runs can be started,
and the status/history of current and past batch runs can be displayed.
Current batch runs can be interrupted (which is not guaranteed to happen
immediately).
Batches
From the batches page, new independent batches
(not associated with a configuration) can be created, existing batches
can be edited and removed. All existing batches - independent as well as
belonging to a configuration - are shown, unless they are special (if
they start with a @) or if the configuration has not yet been
completed (see initializing
templates).

batches
In case that the conditions are met, batch runs can be started, and the status/history of current and past batch runs can be displayed. Current batch runs can be interrupted (which is not guaranteed to happen immediately).
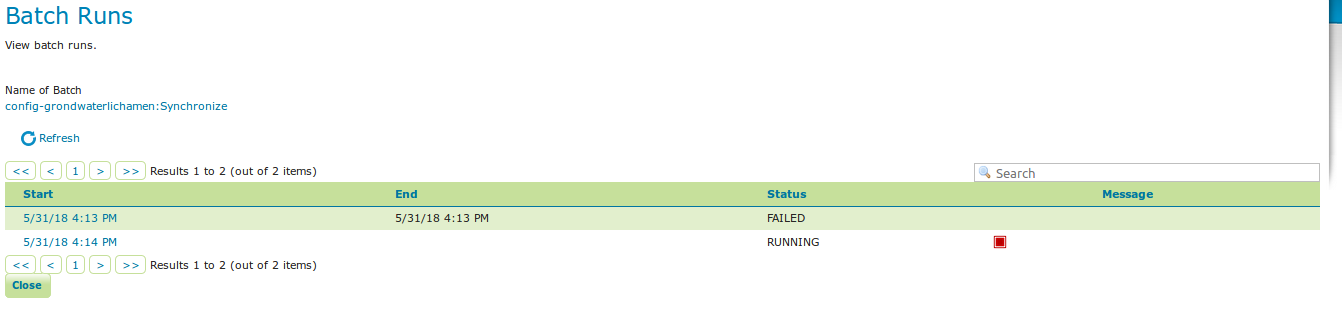
batchruns
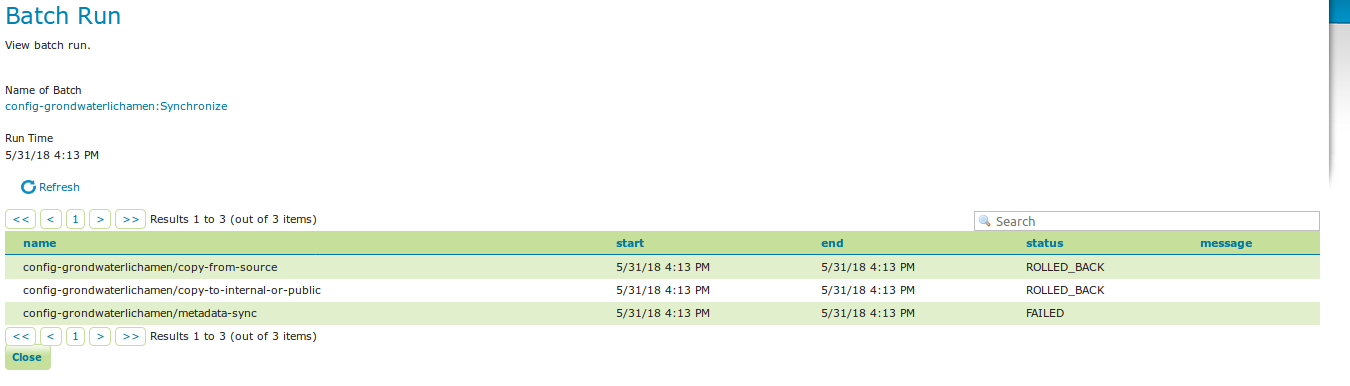
batchrun
Once you open a new or existing batch, one can add or remove tasks from it and change the order of the tasks. You can also enable/disable the batch (if disabled, the batch is not scheduled) and choose the scheduling time. The user can choose between a daily schedule (with time), weekly (with day of week and time), monthly (with day of month and time) or specify a custom cron expression.
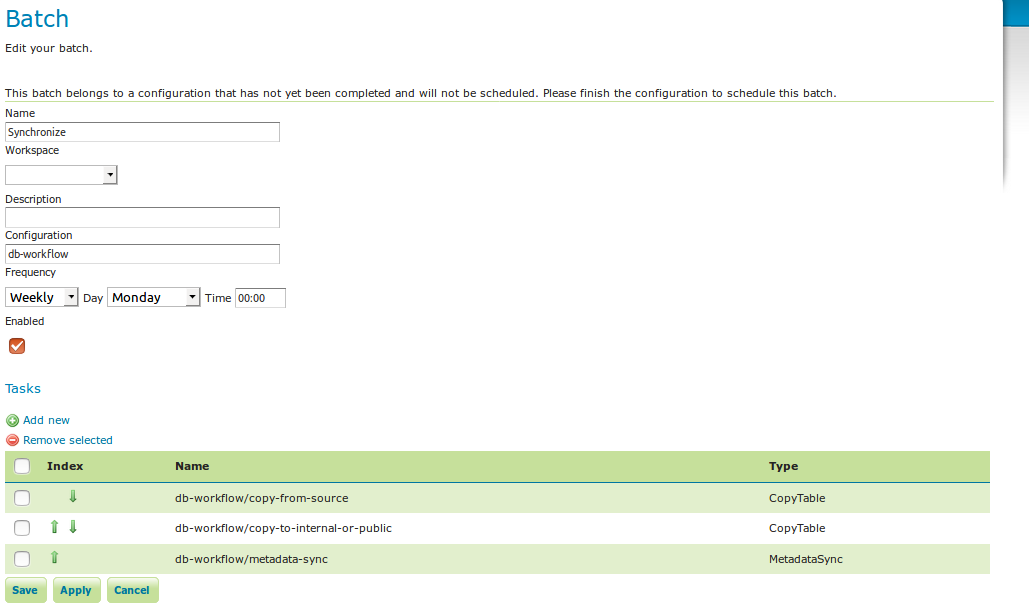
batch synchronize
Task Types
CopyTableTaskCopy a database table from one database to another. The user can specify a source database, source table name, target database and target table name. Supports commit/rollback by creating a temporary table.CreateViewTaskCreate a view based on a single table. The user can specify the database, the table name, the selected fields and (optionally) a where condition. Supports commit/rollback by creating a temporary view.CreateComplexViewTaskCreate a view based on a multiple tables. The user can specify the database and a whole query, where it can use any other configuration attribute in the form of ‘${placeholder}’. Supports commit/rollback by creating a temporary view.CopyFileTaskCopy a file from one file service to another. Commit/rollback is supported by a versioning system, where the version of the file is inserted into the file name. The location of the version number is specified in the path as###. On commit, the older version is removed. On rollback, the newer version is removed. The publication tasks will automatically publish the latest version.LocalDbPublicationTaskPublish a database layer locally. The user can specify database, table and a layer name. Supports commit/rollback by advertising or removing the layer it created.RemoteDbPublicationTaskPublish a database layer to another geoserver. The user can specify a target geoserver, a source layer and a target database. All information is taken from the source layer except for the target database which may be different. Supports commit/rollback through creating a temporary (unadvertised) layer.LocalFilePublicationTaskPublish a file layer locally (taster or shapefile). The user can specify a file service, a file (which can be uploaded unto the service) and a layer name. Supports commit/rollback by advertising or removing the layer it created.RemoteFilePublicationTaskPublish a file layer locally (taster or shapefile). The user can specify a target geoserver, a source layer and a target file service and path (optional). All information is taken from the source layer except for the file service and path which may be different. Supports commit/rollback through creating a temporary (unadvertised) layer.MetaDataSyncTaskSynchronise the metadata between a local layer and a layer on another geoserver (without re-publishing). The user can specify a target geoserver, a local and a remote layer. Does not support commit/rollback.
Import Tool
The import tool allows bulk creation of an unlimited amount of configurations on the basis of a template and a CSV file with attribute values. Contrary to the rest of the configuration, this function is only exposed via a REST service and not via the GUI. The import tool will generate a new configuration for each line in the CSV file, except for the first. The first line must specify the attribute names which should all match attributes that exist in the template. The CSV file must specify a valid attribute value for each required attribute.
To invoke the import tool, POST your CSV file to
http://{geoserver-host}/geoserver/taskmanager-import/{template}
Examples
Consider the following setup.
Three geoservers:
work geoserver: a geoserver only available in the local network, only used by administrators. New and updated data is published here as layers for the first time, to test both the validity of data and the publication configuration.internal geoserver: a geoserver only available in the local network, for internal users.public geoserver: a geoserver available on the internet, for the general public.
Several databases:
multiple source databases: these are databases provided by partners that provide new and updated data. they are not used to directly publish on a geoserver.work database: database used by thework geoserverwhere its vector data is stored.internal database: database used by theinternal geoserverwhere its vector data is stored.public database: database used by thepublic geoserverwhere its vector data is stored.
A typical workflow for a new layer goes as follows:
- A new table is copied from a
source databaseto thework databaseand then published on thework geoserver - After testing, the table is either copied to the
internal databaseand published on theinternal geoserveror copied to thepublic databaseand published on thepublic geoserver. - Every week, data is synchronised between the three databases and metadata is synchronised between the two geoservers.
Taskmanager should be installed only on the work geoserver. Then we
could make the following template:
template db workflow
with the following batches:
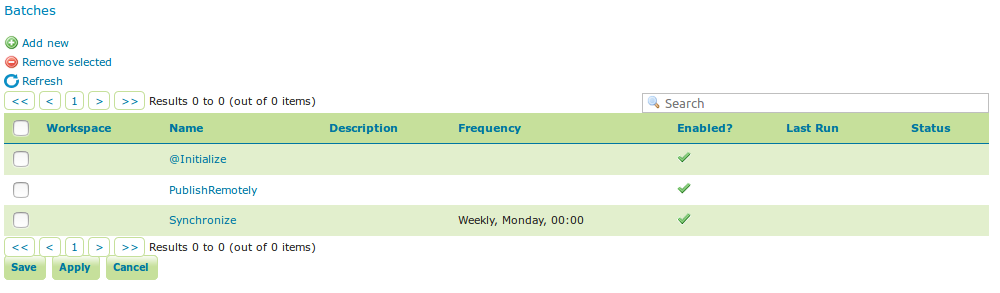
template db workflow batches
The @Initialize batch:
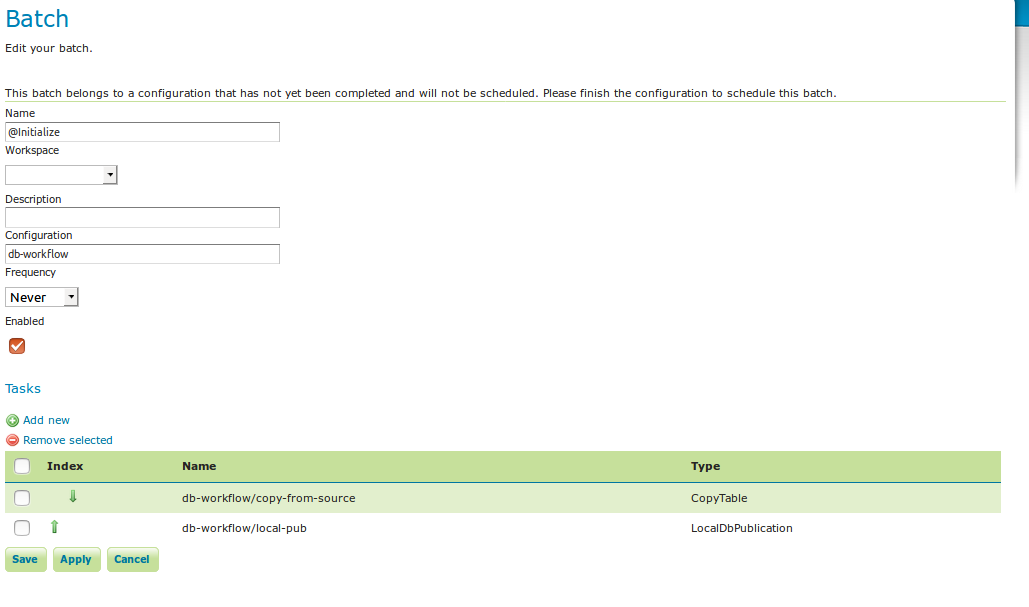
batch initialize
The PublishRemotely batch:
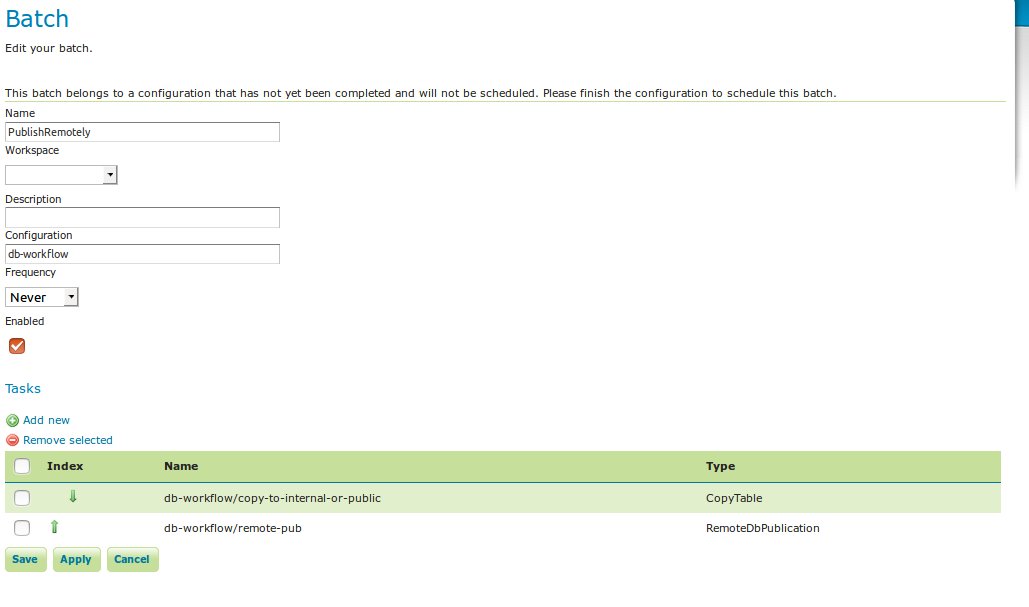
batch publish remotely
The Synchronize batch:
batch synchronize
When we now create a new configuration based on this template we choose a source database, table name and layer name:
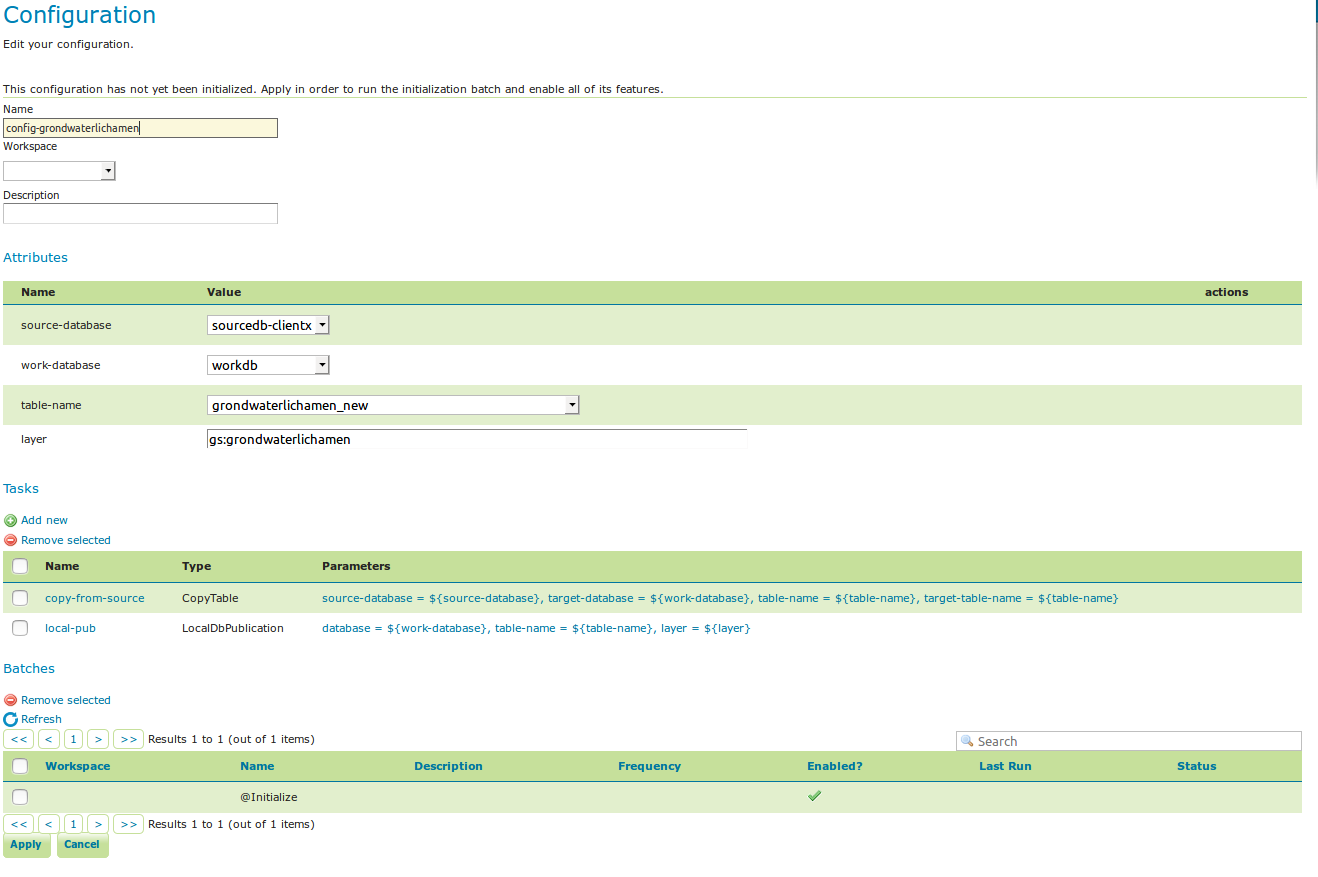
workflow config
After clicking apply, the configuration is being initialized (the layer is created locally)…
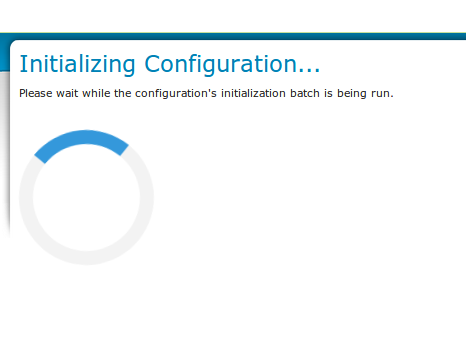
initializing…
We can now fill in the rest of the details, save, and make the remote publication. The synchronization is scheduled weekly.
workflow config 2