GetFeatureInfo Templates
This tutorial describes how to use the GeoServer template system to create custom HTML GetFeatureInfo responses.
Introduction
GetFeatureInfo is a WMS standard call that allows one to retrieve information about features and coverages displayed in a map. The map can be composed of various layers, and GetFeatureInfo can be instructed to return multiple feature descriptions, which may be of different types. GetFeatureInfo can generate output in various formats: GML2, plain text and HTML. Templating is concerned with the HTML one.
The default HTML output is a sequence of titled tables, each one for a different layer. The following example shows the default output for the tiger-ny basemap (included in the above cited releases, and onwards).
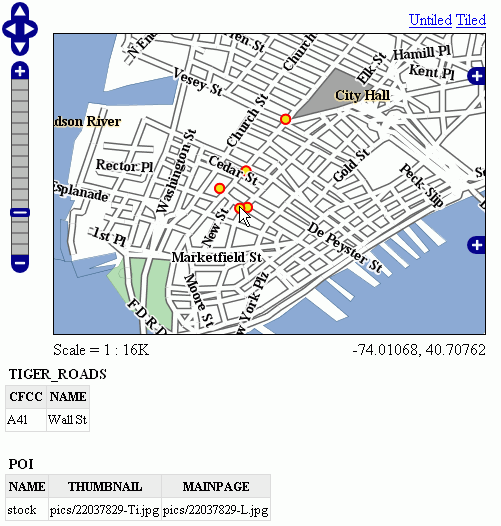
Default Output
Standard Templates
The following assumes you’re already up to speed with Freemarker templates. If you’re not, read the Freemarker Templates tutorial, and the KML Placemark Templates page, which has simple examples.
The default output is generated by the standard templates, which are three:
header.ftlcontent.ftlfooter.ftl
The header template is invoked just once, and usually contains the start of the HTML page, along with some CSS. The default header template looks like this (as you can see, it’s completely static, and it’s in fact not provided with any variable you could expand):
<#--
Header section of the GetFeatureInfo HTML output. Should have the <head> section, and
a starter of the <body>. It is advised that eventual css uses a special class for featureInfo,
since the generated HTML may blend with another page changing its aspect when usign generic classes
like td, tr, and so on.
-->
<html>
  <head>
    <title>GeoServer GetFeatureInfo output</title>
  </head>
  <style type="text/css">
        table.featureInfo, table.featureInfo td, table.featureInfo th {
                border:1px solid #ddd;
                border-collapse:collapse;
                margin:0;
                padding:0;
                font-size: 90%;
                padding:.2em .1em;
        }
        table.featureInfo th{
            padding:.2em .2em;
                text-transform:uppercase;
                font-weight:bold;
                background:#eee;
        }
        table.featureInfo td{
                background:#fff;
        }
        table.featureInfo tr.odd td{
                background:#eee;
        }
        table.featureInfo caption{
                text-align:left;
                font-size:100%;
                font-weight:bold;
                text-transform:uppercase;
                padding:.2em .2em;
        }
  </style>
  <body>
The footer template is similar, a static template used to close the HTML document properly:
<#--
Footer section of the GetFeatureInfo HTML output. Should close the body and the html tag.
-->
  </body>
</html>
The content template is the one that turns feature objects into actual HTML tables. The template is called multiple times: each time it’s fed with a different feature collection, whose features all have the same type. In the above example, the template has been called once for the roads, and once for the points of interest (POI). Here is the template source:
<#--
Body section of the GetFeatureInfo template, it's provided with one feature collection, and
will be called multiple times if there are various feature collections
-->
<table class="featureInfo">
  <caption class="featureInfo">${type.name}</caption>
  <tr>
<#list type.attributes as attribute>
  <#if !attribute.isGeometry>
    <th >${attribute.name}</th>
  </#if>
</#list>
  </tr>

<#assign odd = false>
<#list features as feature>
  <#if odd>
    <tr class="odd">
  <#else>
    <tr>
  </#if>
  <#assign odd = !odd>

  <#list feature.attributes as attribute>
    <#if !attribute.isGeometry>
      <td>${attribute.value}</td>
    </#if>
  </#list>
  </tr>
</#list>
</table>
<br/>
As you can see there is a first loop scanning type and outputting its attributes into the table header, then a second loop going over each feature in the collection (features). From each feature, the attribute collections are accessed to dump the attribute value. In both cases, geometries are skipped, since there is not much point in including them in the tabular report. In the table building code you can also see how odd rows are given the “odd” class, so that their background colors improve readability.
Custom Templates
So, what do you have to do if you want to override the custom templates? Well, it depends on which template you want to override.
header.ftl and footer.ftl are type independent, so if you want to override them you have to place a file named header.ftl or footer.ftl in the templates directory, located in your GeoServer GeoServer data directory. On the contrary, content.ftl may be generic, or specific to a feature type.
For example, let’s say you would prefer a bulleted list appearance for your feature info output, and you want this to be applied to all GetFeatureInfo HTML output. In that case you would drop the following content.ftl in the templates directory:
<ul>
<#list features as feature>
  <li><b>Type: ${type.name}</b> (id: <em>${feature.fid}</em>):
  <ul>
  <#list feature.attributes as attribute>
    <#if !attribute.isGeometry>
      <li>${attribute.name}: ${attribute.value}</li>
    </#if>
  </#list>
  </ul>
  </li>
</#list>
</ul>
With this template in place, the output would be:
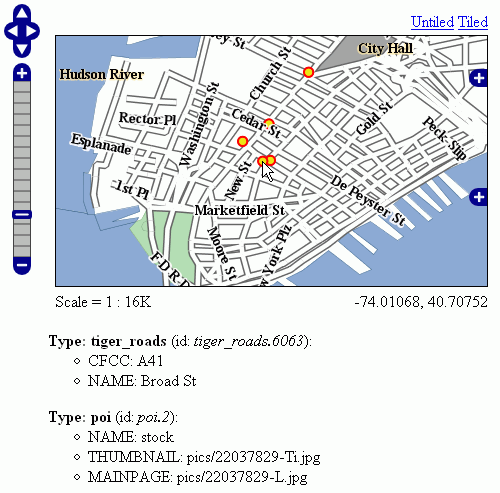
Bulleted List Output
Looking at the output we notice that point of interest features refer to image files, which we know are stored inside the default GeoServer distribution in the demo_app/pics path. So, we could provide a POI specific override that actually loads the images.
This is easy: just put the following template in the feature type folder, which in this case is workspaces/topp/DS_poi/poi (you should refer to your Internet visible server address instead of localhost, or its IP if you have fixed IPs):
<ul>
<#list features as feature>
  <li><b>Point of interest, "${feature.NAME.value}"</b>: <br/>
  <img src="http://localhost:8080/geoserver/popup_map/${feature.THUMBNAIL.value}"/>
  </li>
</#list>
</ul>
With this additional template, the output is:
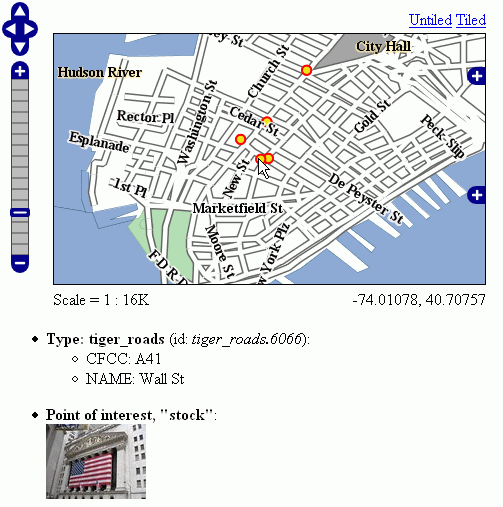
Output with Thumbnail Image
As you can see, roads are still using the generic template, whilst POI is using its own custom template.
Advanced Formating
The value property of Feature attribute values are given by geoserver in String form, using a sensible default depending on the actual type of the attribute value. If you need to access the raw attribute value in order to apply a custom format (for example, to output "Enabled" or "Disabled" for a given boolean property, instead of the default true/false, you can just use the rawValue property instead of value. For example: ${attribute.rawValue?string("Enabled", "Disabled")} instead of just ${attribute.value}.