deck.gl渲染TileLayer切片图层
目录
deck.gl渲染TileLayer切片图层
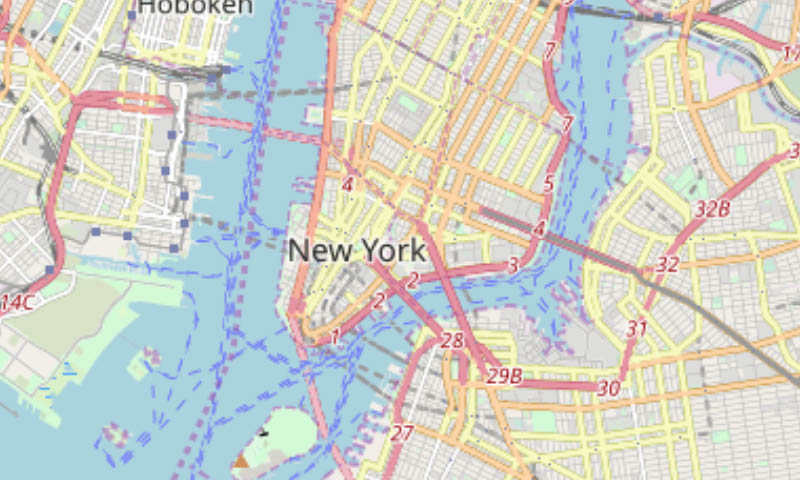
效果图
在线地址
deck.gl渲染TileLayer切片图层
https://tool.giserdqy.com/deckgl/tile-layer.html
功能说明
本实例实现了deck.gl加载底图,使用TileLayer加载切片数据,渲染到地图上。其实现原理是请求到每张切片后,根据tile的四至bounds初始化BitmapLayer图层deck.gl渲染BitmapLayer位图图层,添加到子图层上,实现了拼接完整图层
代码解析
- 此部分是引入在线deck.gl包,设置了基本的css样式
<html>
  <head>
    <title>deck.gl TileLayer</title>
    <script src="https://unpkg.com/deck.gl@^8.8.0/dist.min.js"></script>
  </head>

<body style="margin:0; width: 100vw; height: 100vh;"></body>- 这部分是es6写法,引入需要的模块DeckGL、TileLayer,并初始化DeckGL(GeoJsonLayer已经有过解释可参照deck.gl渲染GeoJsonLayer
https://www.giserdqy.com/secdev/deckgl/39849/
初始化TileLayer图层,详细配置说明见注释
  <script type="text/javascript">

    const {DeckGL, TileLayer, BitmapLayer} = deck;

    new DeckGL({
      initialViewState: {
        longitude: -122.45,
        latitude: 37.78,
        zoom: 11,
        maxZoom: 16
      },
      controller: true,
      layers: [
        new TileLayer({ // 初始化TileLayer图层
          // https://wiki.openstreetmap.org/wiki/Slippy_map_tilenames#Tile_servers
          data: 'https://c.tile.openstreetmap.org/{z}/{x}/{y}.png', // 切片地址

          minZoom: 0, // 切片显示最小级别
          maxZoom: 19, // 切片显示最大级别

          renderSubLayers: props => { // 子图层渲染
            const {
              bbox: {west, south, east, north}
            } = props.tile;// 读取每张瓦片的四至

            return new BitmapLayer(props, { // 返回使用BitMapLayer渲染的子图层
              data: null,
              image: props.data, // 图片为该瓦片的数据
              bounds: [west, south, east, north] // 指定该瓦片的四至bounds
            });
          }
        })
      ]
    });

  </script>
源代码
拷贝到html文件中可直接用浏览器打开
<html>
  <head>
    <title>deck.gl TileLayer</title>
    <script src="https://unpkg.com/deck.gl@^8.8.0/dist.min.js"></script>
  </head>

  <body style="margin:0; width: 100vw; height: 100vh;"></body>

  <script type="text/javascript">

    const {DeckGL, TileLayer, BitmapLayer} = deck;

    new DeckGL({
      initialViewState: {
        longitude: -122.45,
        latitude: 37.78,
        zoom: 11,
        maxZoom: 16
      },
      controller: true,
      layers: [
        new TileLayer({
          // https://wiki.openstreetmap.org/wiki/Slippy_map_tilenames#Tile_servers
          data: 'https://c.tile.openstreetmap.org/{z}/{x}/{y}.png',

          minZoom: 0,
          maxZoom: 19,

          renderSubLayers: props => {
            const {
              bbox: {west, south, east, north}
            } = props.tile;

            return new BitmapLayer(props, {
              data: null,
              image: props.data,
              bounds: [west, south, east, north]
            });
          }
        })
      ]
    });

  </script>
</html>