
Cesium源码剖析—Ambient Occlusion(环境光遮蔽)
目录
Cesium源码剖析—Ambient Occlusion(环境光遮蔽)
Ambient Occlusion简称AO,中文没有太确定的叫法,一般译作环境光遮蔽。百度百科上对AO的解释是这样的:AO是来描绘物体和物体相交或靠近的时候遮挡周围漫反射光线的效果,可以解决或改善漏光、飘和阴影不实等问题,解决或改善场景中缝隙、褶皱与墙角、角线以及细小物体等的表现不清晰问题,综合改善细节尤其是暗部阴影,增强空间的层次感、真实感,同时加强和改善画面明暗对比,增强画面的艺术性。AO简单来说就是根据周围物体对光线的遮挡程度,改变明暗效果。AO具体理论原理在网上都可以找到,感兴趣的可以去查阅,此处只把Cesium中AO的实现过程作一下介绍。闲言少叙,直接上代码。
1. 开启AO及效果
在Cesium中开启AO效果非常简单,和之前讲的开启Silhouette效果类似,代码如下:
1 var ambientOcclusion = viewer.scene.postProcessStages.ambientOcclusion;
2 ambientOcclusion.enabled = true;
3 ambientOcclusion.uniforms.ambientOcclusionOnly = false;
4 ambientOcclusion.uniforms.intensity = 3;
5 ambientOcclusion.uniforms.bias = 0.1;
6 ambientOcclusion.uniforms.lengthCap = 0.03;
7 ambientOcclusion.uniforms.stepSize = 1;
8 ambientOcclusion.uniforms.blurStepSize = 0.86;
没有开启AO效果如下图一,开启AO效果如下图二,单纯的AO图如图三:

2. JS内部代码实现
在PostProcessStageLibrary类中添加AO功能的代码如下:
  1 PostProcessStageLibrary.createAmbientOcclusionStage = function() {
  2         var generate = new PostProcessStage({
  3             name : 'czm_ambient_occlusion_generate',
  4             fragmentShader : AmbientOcclusionGenerate,
  5             uniforms : {
  6                 intensity : 3.0,
  7                 bias : 0.1,
  8                 lengthCap : 0.26,
  9                 stepSize : 1.95,
 10                 frustumLength : 1000.0,
 11                 randomTexture : undefined
 12             }
 13         });
 14         var blur = createBlur('czm_ambient_occlusion_blur');
 15         blur.uniforms.stepSize = 0.86;
 16         var generateAndBlur = new PostProcessStageComposite({
 17             name : 'czm_ambient_occlusion_generate_blur',
 18             stages : [generate, blur]
 19         });
 20
 21         var ambientOcclusionModulate = new PostProcessStage({
 22             name : 'czm_ambient_occlusion_composite',
 23             fragmentShader : AmbientOcclusionModulate,
 24             uniforms : {
 25                 ambientOcclusionOnly : false,
 26                 ambientOcclusionTexture : generateAndBlur.name
 27             }
 28         });
 29
 30         var uniforms = {};
 31         defineProperties(uniforms, {
 32             intensity : {
 33                 get : function() {
 34                     return generate.uniforms.intensity;
 35                 },
 36                 set : function(value) {
 37                     generate.uniforms.intensity = value;
 38                 }
 39             },
 40             bias : {
 41                 get : function() {
 42                     return generate.uniforms.bias;
 43                 },
 44                 set : function(value) {
 45                     generate.uniforms.bias = value;
 46                 }
 47             },
 48             lengthCap : {
 49                 get : function() {
 50                     return generate.uniforms.lengthCap;
 51                 },
 52                 set : function(value) {
 53                     generate.uniforms.lengthCap = value;
 54                 }
 55             },
 56             stepSize : {
 57                 get : function() {
 58                     return generate.uniforms.stepSize;
 59                 },
 60                 set : function(value) {
 61                     generate.uniforms.stepSize = value;
 62                 }
 63             },
 64             frustumLength : {
 65                 get : function() {
 66                     return generate.uniforms.frustumLength;
 67                 },
 68                 set : function(value) {
 69                     generate.uniforms.frustumLength = value;
 70                 }
 71             },
 72             randomTexture : {
 73                 get : function() {
 74                     return generate.uniforms.randomTexture;
 75                 },
 76                 set : function(value) {
 77                     generate.uniforms.randomTexture = value;
 78                 }
 79             },
 80             delta : {
 81                 get : function() {
 82                     return blur.uniforms.delta;
 83                 },
 84                 set : function(value) {
 85                     blur.uniforms.delta = value;
 86                 }
 87             },
 88             sigma : {
 89                 get : function() {
 90                     return blur.uniforms.sigma;
 91                 },
 92                 set : function(value) {
 93                     blur.uniforms.sigma = value;
 94                 }
 95             },
 96             blurStepSize : {
 97                 get : function() {
 98                     return blur.uniforms.stepSize;
 99                 },
100                 set : function(value) {
101                     blur.uniforms.stepSize = value;
102                 }
103             },
104             ambientOcclusionOnly : {
105                 get : function() {
106                     return ambientOcclusionModulate.uniforms.ambientOcclusionOnly;
107                 },
108                 set : function(value) {
109                     ambientOcclusionModulate.uniforms.ambientOcclusionOnly = value;
110                 }
111             }
112         });
113
114         return new PostProcessStageComposite({
115             name : 'czm_ambient_occlusion',
116             stages : [generateAndBlur, ambientOcclusionModulate],
117             inputPreviousStageTexture : false,
118             uniforms : uniforms
119         });
120     };
从上面的代码可以看出,代码创建了generate、blur、ambientOcclusionModulate三个处理阶段。generate负责计算屏幕上每个像素的遮挡值,并生成一张灰度图;blur是对generate生成的灰度图就行模糊平滑处理;ambientOcclusionModulate负责根据灰度图对原始场景颜色就行调整。下面分别对这三个阶段进行详细介绍。
2.1 generate代码实现
计算像素遮蔽因子的过程可以概括为:在像素周围,计算采样点对中心像素的遮蔽值,然后对遮蔽值进行累加,最后得到中心像素的遮蔽值。具体实现可以分为两部分:
1:在视空间下计算像素代表面片的法向量
将中心像素以及上下左右的四个像素转换到视空间下,就得到了这五个像素在视空间下的三维位置,记为posInCamera、posInCameraUp、posInCameraDown、posInCameraLeft、posInCameraRight。通过上下左右四个点与中心点的差值得到up、down、left、right四个向量,分别从上下向量、左右向量中选取模较小的向量,记为DX、DY。最后通过normalize(cross(DY, DX))得到中心像素的法向量。整个过程如下图所示:

glsl对应的代码如下:
 1 vec4 clipToEye(vec2 uv, float depth)
 2 {
 3     vec2 xy = vec2((uv.x * 2.0 - 1.0), ((1.0 - uv.y) * 2.0 - 1.0));
 4     vec4 posEC = czm_inverseProjection * vec4(xy, depth, 1.0);
 5     posEC = posEC / posEC.w;
 6     return posEC;
 7 }
 8
 9 //Reconstruct Normal Without Edge Removation
10 vec3 getNormalXEdge(vec3 posInCamera, float depthU, float depthD, float depthL, float depthR, vec2 pixelSize)
11 {
12     vec4 posInCameraUp = clipToEye(v_textureCoordinates - vec2(0.0, pixelSize.y), depthU);
13     vec4 posInCameraDown = clipToEye(v_textureCoordinates + vec2(0.0, pixelSize.y), depthD);
14     vec4 posInCameraLeft = clipToEye(v_textureCoordinates - vec2(pixelSize.x, 0.0), depthL);
15     vec4 posInCameraRight = clipToEye(v_textureCoordinates + vec2(pixelSize.x, 0.0), depthR);
16
17     vec3 up = posInCamera.xyz - posInCameraUp.xyz;
18     vec3 down = posInCameraDown.xyz - posInCamera.xyz;
19     vec3 left = posInCamera.xyz - posInCameraLeft.xyz;
20     vec3 right = posInCameraRight.xyz - posInCamera.xyz;
21
22     vec3 DX = length(left) < length(right) ? left : right;
23     vec3 DY = length(up) < length(down) ? up : down;
24
25     return normalize(cross(DY, DX));
26 }
27
28 void main(void)
29 {
30     float depth = czm_readDepth(depthTexture, v_textureCoordinates);
31     vec4 posInCamera = clipToEye(v_textureCoordinates, depth);
32
33     if (posInCamera.z > frustumLength)
34     {
35         gl_FragColor = vec4(1.0);
36         return;
37     }
38
39     vec2 pixelSize = 1.0 / czm_viewport.zw;
40     float depthU = czm_readDepth(depthTexture, v_textureCoordinates- vec2(0.0, pixelSize.y));
41     float depthD = czm_readDepth(depthTexture, v_textureCoordinates+ vec2(0.0, pixelSize.y));
42     float depthL = czm_readDepth(depthTexture, v_textureCoordinates- vec2(pixelSize.x, 0.0));
43     float depthR = czm_readDepth(depthTexture, v_textureCoordinates+ vec2(pixelSize.x, 0.0));
44     vec3 normalInCamera = getNormalXEdge(posInCamera.xyz, depthU, depthD, depthL, depthR, pixelSize);
45 }
2: 计算周围空间对面片的遮蔽值
在上一步得到了视空间下的面片法向量,接下来就是计算周围空间对面片的遮挡值。过程可以概括为以下几个步骤:
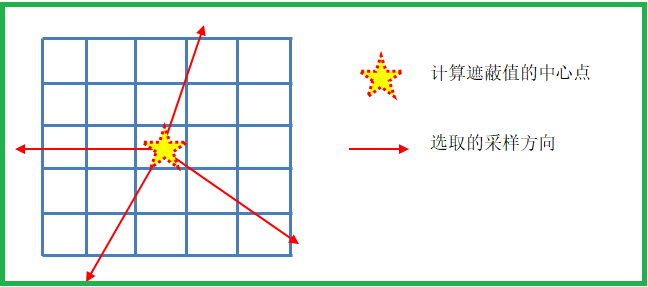
(1)选取要参与遮蔽值计算的空间。周围空间范围的选择是通过在像素坐标系下以中心像素为圆心,以设定值为半径,得到一个圆,但并不是要取圆中的所有像素,因为这样会带来很大的计算量。取而代之的是在四个方向上进行采样,方向值引入一个随机扰动,可以避免出现特别规则的阴影效果。
(2)在选取了方向后,就在该方向上根据设定的采样步长进行采样,得到新的像素,将该像素转换到视空间下,记为stepPosInCamera。
(3)通过stepPosInCamera与posInCamera作差值得到向量diffVec,向量的长度len代表了该点与中心点的距离。通过lengthCap这个值对采样的空间距离进行限制,超出该值的采样点将作废。
(4)通过向量与法向量的点乘,得到值dotVal。dotVal实际表示了两个向量之间夹角的大小,该值越大,表示与法向量夹角越小,遮蔽值越大。
(5)通过len的长度计算该位置遮蔽值的权重,得到一个遮蔽值localAO。
(6)在同一个方向上选取一个最大的localAO值作为该方向上的ao值,然后将四个方向上的ao值相加,并除以4,得到新的ao。
(7)根据给定的intensity参数对ao值就行幂次变换,得到最终的ao值。
选取采样方向的效果如下图所示:
对应的glsl代码如下:
 1 float ao = 0.0;
 2     vec2 sampleDirection = vec2(1.0, 0.0);
 3     float gapAngle = 90.0 * czm_radiansPerDegree;
 4
 5     // RandomNoise
 6     float randomVal = texture2D(randomTexture, v_textureCoordinates).x;
 7
 8     float inverseViewportWidth = 1.0 / czm_viewport.z;
 9     float inverseViewportHeight = 1.0 / czm_viewport.w;
10
11     //Loop for each direction
12     for (int i = 0; i < 4; i++)
13     {
14         float newGapAngle = gapAngle * (float(i) + randomVal);
15         float cosVal = cos(newGapAngle);
16         float sinVal = sin(newGapAngle);
17
18         //Rotate Sampling Direction
19         vec2 rotatedSampleDirection = vec2(cosVal * sampleDirection.x - sinVal * sampleDirection.y, sinVal * sampleDirection.x + cosVal * sampleDirection.y);
20         float localAO = 0.0;
21         float localStepSize = stepSize;
22
23         //Loop for each step
24         for (int j = 0; j < 6; j++)
25         {
26             vec2 directionWithStep = vec2(rotatedSampleDirection.x * localStepSize * inverseViewportWidth, rotatedSampleDirection.y * localStepSize * inverseViewportHeight);
27             vec2 newCoords = directionWithStep + v_textureCoordinates;
28
29             //Exception Handling
30             if(newCoords.x > 1.0 || newCoords.y > 1.0 || newCoords.x < 0.0 || newCoords.y < 0.0)
31             {
32                 break;
33             }
34
35             float stepDepthInfo = czm_readDepth(depthTexture, newCoords);
36             vec4 stepPosInCamera = clipToEye(newCoords, stepDepthInfo);
37             vec3 diffVec = stepPosInCamera.xyz - posInCamera.xyz;
38             float len = length(diffVec);
39
40             if (len > lengthCap)
41             {
42                 break;
43             }
44
45             float dotVal = clamp(dot(normalInCamera, normalize(diffVec)), 0.0, 1.0 );
46             float weight = len / lengthCap;
47             weight = 1.0 - weight * weight;
48
49             if (dotVal < bias)
50             {
51                 dotVal = 0.0;
52             }
53
54             localAO = max(localAO, dotVal * weight);
55             localStepSize += stepSize;
56         }
57         ao += localAO;
58     }
59
60     ao /= 4.0;
61     ao = 1.0 - clamp(ao, 0.0, 1.0);
62     ao = pow(ao, intensity);
63     gl_FragColor = vec4(vec3(ao), 1.0);
2.2 blur代码实现
对上一步得到的遮蔽值图需要进行平滑,采用的是高斯平滑算法。实现思路就是在水平方向和垂直方向上根据权重叠加相邻像素值,算法讲解可以查询https://developer.nvidia.com/gpugems/GPUGems3/gpugems3_ch40.html。glsl实现代码如下:
 1 #define SAMPLES 8
 2
 3 uniform float delta;
 4 uniform float sigma;
 5 uniform float direction; // 0.0 for x direction, 1.0 for y direction
 6
 7 uniform sampler2D colorTexture;
 8
 9 #ifdef USE_STEP_SIZE
10 uniform float stepSize;
11 #else
12 uniform vec2 step;
13 #endif
14
15 varying vec2 v_textureCoordinates;
16 void main()
17 {
18     vec2 st = v_textureCoordinates;
19     vec2 dir = vec2(1.0 - direction, direction);
20
21 #ifdef USE_STEP_SIZE
22     vec2 step = vec2(stepSize / czm_viewport.zw);
23 #else
24     vec2 step = step;
25 #endif
26
27     vec3 g;
28     g.x = 1.0 / (sqrt(czm_twoPi) * sigma);
29     g.y = exp((-0.5 * delta * delta) / (sigma * sigma));
30     g.z = g.y * g.y;
31
32     vec4 result = texture2D(colorTexture, st) * g.x;
33     for (int i = 1; i < SAMPLES; ++i)
34     {
35         g.xy *= g.yz;
36
37         vec2 offset = float(i) * dir * step;
38         result += texture2D(colorTexture, st - offset) * g.x;
39         result += texture2D(colorTexture, st + offset) * g.x;
40     }
41     gl_FragColor = result;
42 }
2.3 ambientOcclusionModulate代码实现
ambientOcclusionModulate非常简单,就是根据ao值对原始场景的图片就行明暗处理,产生阴影效果。glsl代码如下:
 1 uniform sampler2D colorTexture;
 2 uniform sampler2D ambientOcclusionTexture;
 3 uniform bool ambientOcclusionOnly;
 4 varying vec2 v_textureCoordinates;
 5
 6 void main(void)
 7 {
 8     vec3 color = texture2D(colorTexture, v_textureCoordinates).rgb;
 9     vec3 ao = texture2D(ambientOcclusionTexture, v_textureCoordinates).rgb;
10     gl_FragColor.rgb = ambientOcclusionOnly ? ao : ao * color;
11 }
3. 总结
Cesium中AO的实现方式属于HBAO(Horizon-based Ambient Occlusion),相对于传统的SSAO,HBAO对阴影的处理效果更好,使场景更加真实。终于把HDAO的实现原理彻底搞明白了,一个字:爽,哈哈哈!!!

