
第5章 五彩的光源(二)
目录
第5章 五彩的光源(二)

1、本章你将了解怎么使用光源
2、以及各种光源的区别,这些区别会通过实例对比来给大家讲清楚。这种对比方式应该是讲解最好的思路。
,
5 脚印四:方向光(平行光)
平行光又称为方向光(Directional Light),是一组没有衰减的平行的光线,类似太阳光的效果。
方向光的模型如图:

方向光的构造函数如下所示:
THREE.DirectionalLight = function ( hex, intensity )
其参数如下:
Hex:关系的颜色,用16进制表示
Intensity:光线的强度,默认为1。因为RGB的三个值均在0~255之间,不能反映出光照的强度变化,光照越强,物体表面就更明亮。它的取值范围是0到1。如果为0,表示光线基本没什么作用,那么物体就会显示为黑色。呆会你可以尝试来更改这个参数,看看实际的效果
我们来看一个方向光的例子:
一个红色的方向光,把它放在(0,0,1)的位置,密度为1,照射在一个长方体中。效果如下图所示:

你可以再5-3.html中,看到它的完整代码:
<!DOCTYPE html>
<html>
	<head>
		<meta charset="UTF-8">
		<title>Three框架</title>
		<script src="js/three.js"></script>
		<style type="text/css">
			div#canvas-frame {
				border: none;
				cursor: pointer;
				width: 100%;
				height: 600px;
				background-color: #EEEEEE;
			}

		</style>
		<script>
            var renderer;
            function initThree() {
                width = document.getElementById('canvas-frame').clientWidth;
                height = document.getElementById('canvas-frame').clientHeight;
                renderer = new THREE.WebGLRenderer({
                    antialias : true
                });
                renderer.setSize(width, height);
                document.getElementById('canvas-frame').appendChild(renderer.domElement);
                renderer.setClearColor(0xFFFFFF, 1.0);
            }

            var camera;
            function initCamera() {
                camera = new THREE.PerspectiveCamera(45, width / height, 1, 10000);
                camera.position.x = 600;
                camera.position.y = 0;
                camera.position.z = 600;
                camera.up.x = 0;
                camera.up.y = 1;
                camera.up.z = 0;
                camera.lookAt({
                    x : 0,
                    y : 0,
                    z : 0
                });
            }

            var scene;
            function initScene() {
                scene = new THREE.Scene();
            }

            var light;
            function initLight() {
                // A start
                // 第二个参数是光源强度,你可以改变它试一下
                light = new THREE.DirectionalLight(0xFF0000,1);
                // 位置不同,方向光作用于物体的面也不同,看到的物体各个面的颜色也不一样
                light.position.set(0,0,1);
                scene.add(light);
                // A end
            }

            var cube;
            function initObject() {
                var geometry = new THREE.CubeGeometry( 200, 100, 50,4,4);
                var material = new THREE.MeshLambertMaterial( { color:0xFFFFFF} );
                var mesh = new THREE.Mesh( geometry,material);
                mesh.position.set(0,0,0);
                scene.add(mesh);
            }

            function threeStart() {
                initThree();
                initCamera();
                initScene();
                initLight();
                initObject();
                renderer.clear();
                renderer.render(scene, camera);
            }

		</script>
	</head>

	<body onload="threeStart();">
		<div id="canvas-frame"></div>
	</body>
</html>
我们来分析一下上面的代码:
1、在A处,我们定义了一个红色的强度为1的方向光,它的位置为与(0,0,1)。现在你可以将强度值进行更改一下,例如把它分别改为0.2,0.4,0.6,0.8和1.0,请看看渲染的场景的变换。我敢保证,因为光线强度越来越大,所以红色从黑色、暗红、一直到鲜艳的红色了。
2、平行光有一个方向,它的方向是如何决定的呢?
方向由位置和原点(0,0,0)来决定,方向光只与方向有关,与离物体的远近无关。分别将平行光放到(0,0,100),(0,0,50),(0,0,25),(0,0,1),渲染的结果还是红色和黑色,见下图,颜色的深浅不与离物体的距离相关。

但是它与方向有关,如果,我们灯光的位置改为(1,0,0,5),那么效果如图所示:

请仔细领会这幅图的意思。
,
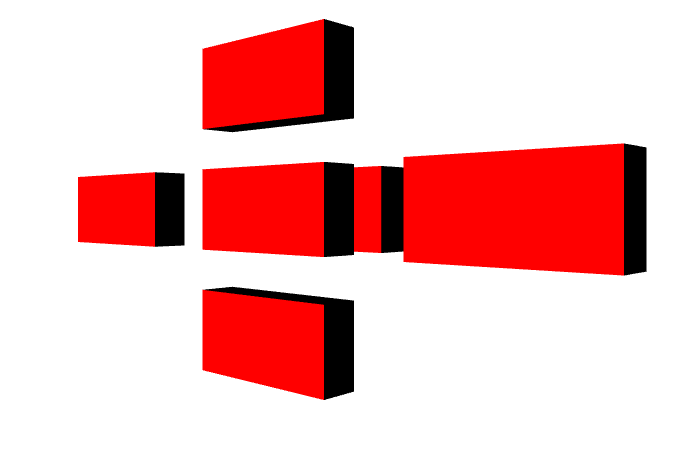
6 脚印五:增加几个物体,从宏观上看一下光源对物体的影响
现在,我们在场景中增加几个物体,来看看,光源对物体的影响。如图是添加了几个物体的截图。仍然是使用方向光。
代码如下,你可以再cube4.html中找到:
	<!DOCTYPE html>
<html>
	<head>
		<meta charset="UTF-8">
		<title>Three框架</title>
		<script src="js/Three.js"></script>
		<style type="text/css">
			div#canvas-frame {
				border: none;
				cursor: pointer;
				width: 100%;
				height: 600px;
				background-color: #EEEEEE;
			}

		</style>
		<script>
            var renderer;
            function initThree() {
                width = document.getElementById('canvas-frame').clientWidth;
                height = document.getElementById('canvas-frame').clientHeight;
                renderer = new THREE.WebGLRenderer({
                    antialias : true
                });
                renderer.setSize(width, height);
                document.getElementById('canvas-frame').appendChild(renderer.domElement);
                renderer.setClearColor(0xFFFFFF, 1.0);
            }

            var camera;
            function initCamera() {
                camera = new THREE.PerspectiveCamera(45, width / height, 1, 10000);
                camera.position.x = 600;
                camera.position.y = 0;
                camera.position.z = 600;
                camera.up.x = 0;
                camera.up.y = 1;
                camera.up.z = 0;
                camera.lookAt({
                    x : 0,
                    y : 0,
                    z : 0
                });
            }

            var scene;
            function initScene() {
                scene = new THREE.Scene();
            }

            var light;
            function initLight() {
//                light = new THREE.AmbientLight(0xFF0000);
//                light.position.set(100, 100, 200);
//                scene.add(light);
                // 聚光灯
                light = new THREE.DirectionalLight(0xFF0000);
                light.position.set(0, 0,1);
                scene.add(light);
            }

            // A start
            var cube;
            function initObject() {
                var geometry = new THREE.CubeGeometry( 200, 100, 50,4,4);
                var material = new THREE.MeshLambertMaterial( { color:0xFFFFFF} );
                var mesh = new THREE.Mesh( geometry,material);
                mesh.position.set(0,0,0);
                scene.add(mesh);

                var geometry2 = new THREE.CubeGeometry( 200, 100, 50,4,4);
                var material2 = new THREE.MeshLambertMaterial( { color:0xFFFFFF} );
                var mesh2 = new THREE.Mesh( geometry2,material2);
                mesh2.position.set(-300,0,0);
                scene.add(mesh2);

                var geometry3 = new THREE.CubeGeometry( 200, 100, 50,4,4);
                var material3 = new THREE.MeshLambertMaterial( { color:0xFFFFFF} );
                var mesh3 = new THREE.Mesh( geometry3,material3);
                mesh3.position.set(0,-150,0);
                scene.add(mesh3);

                var mesh4 = new THREE.Mesh( geometry3,material3);
                mesh4.position.set(0,150,0);
                scene.add(mesh4);

                var mesh5 = new THREE.Mesh( geometry3,material3);
                mesh5.position.set(300,0,0);
                scene.add(mesh5);

                var mesh6 = new THREE.Mesh( geometry3,material3);
                mesh6.position.set(0,0,-100);
                scene.add(mesh6);

            }
            // A end

            function threeStart() {
                initThree();
                initCamera();
                initScene();
                initLight();
                initObject();
                renderer.clear();
                renderer.render(scene, camera);
            }

		</script>
	</head>

	<body onload="threeStart();">
		<div id="canvas-frame"></div>
	</body>
</html>
在A处,我们一共new了6个Mesh,并将每一个mesh放到了不同的位置,这样就生了上图的模样。这里并没有太多的技术含量,童鞋们只需要如法炮制就ok了。

