Openlayers进阶学习——多标注显示/点击弹出框/图层控制/搜索定位/新增标注等
一、多标注显示
1、多标注显示:通过Feature和Marker实现多点标注。
我对openlayers例子提供的代码做了一些改动,添加单个标注函数如下:
/**
     * Function: addMarker
     * Add a new marker to the markers layer given the following lonlat,
     *     popupClass, and popup contents HTML. Also allow specifying
     *     whether or not to give the popup a close box.
     *
     * Parameters:
     * ll - {<OpenLayers.LonLat>} Where to place the marker
     * popupClass - {<OpenLayers.Class>} Which class of popup to bring up
     *     when the marker is clicked.
     * popupContentHTML - {String} What to put in the popup
     * closeBox - {Boolean} Should popup have a close box?
     * overflow - {Boolean} Let the popup overflow scrollbars?
     */
    function addMarker(markerName,icon,ll, popupClass, popupContentHTML, closeBox, overflow) {

        var feature = new OpenLayers.Feature(markerName,ll,{icon:icon.clone()});
        feature.closeBox = closeBox;
        feature.popupClass = popupClass;
        feature.data.popupContentHTML = popupContentHTML;
        feature.data.overflow = (overflow) ? "auto" : "hidden";

        var marker = feature.createMarker();
        var markerClick = function (evt) {
            if (this.popup == null) {
                this.popup = this.createPopup(this.closeBox);
                this.popup.setBackgroundColor("#E2E7EB");
                this.popup.setBorder("1px #0066ff solid");
                map.addPopup(this.popup);
                this.popup.show();
            } else {
                this.popup.toggle();
            }
            currentPopup = this.popup;
            OpenLayers.Event.stop(evt);
        };
        marker.events.register("mousedown", feature, markerClick);
        markerName.addMarker(marker);
    }
上诉函数中
 if (this.popup == null) {
                this.popup = this.createPopup(this.closeBox);
                this.popup.setBackgroundColor("#E2E7EB");
                this.popup.setBorder("1px #0066ff solid");
                map.addPopup(this.popup);
                this.popup.show();
            } else {
                this.popup.toggle();
            }
            currentPopup = this.popup;
同时也实现了点击弹出框的效果,显示内容见下面。
2、调用上面函数实现多点标注,核心代码如下:
var url = 'gis/img/cctv.gif';
			var sz = new OpenLayers.Size(20, 20);  //尺寸大小
			var calculateOffset = function(size) {
				return new OpenLayers.Pixel(-(size.w/2), -size.h);
			 };

			 var icon = new OpenLayers.Icon(url, sz, null, calculateOffset);
			 var lonLat,popupContentHTML,popupClass;
			 if(cctvList == null){
				 return;
			 }
			//遍历显示
			for(var i=0;i<cctvList.length;i++){
				lonLat = new OpenLayers.LonLat(cctvList[i].gis_x,cctvList[i].gis_y);
				//google地图需要转换坐标
				lonLat.transform(map.displayProjection, map.getProjectionObject());
				device_name = cctvList[i].device_name;
				//popupContentHTML = "<b>  治安监控<br>  "+device_name+"</b>";
				popupContentHTML = createPopupContentHTML('治安监控',cctvList[i]);
				popupClass = OpenLayers.Popup.Anchored;
				addMarker(cctvMarkers,icon,lonLat, popupClass, popupContentHTML,true);
			}
其中cctvList是从数据库获取设备列表json格式;
createPopupContentHTML函数实现点击GIS标注弹出框显示内容;
cctvMarkers是定义的全局图层变量,用于多图层显示控制;
用户通过遍历将多个点在GIS上显示;
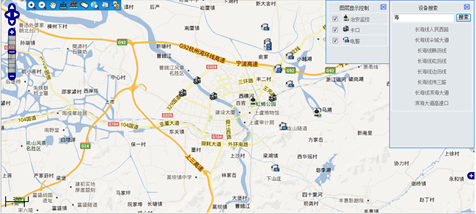
二、图层控制
通过定义全局Markers变量实现不同图层的显示控制。
预先定义几个变量,如:var cctvMarkers,tgsMarkers,epsMarkers; 每个变量表示一个图层,每个图层上的标注通过方法一实现添加即可;
在页面加载时把各图层的标注全部加载完毕,需要隐藏某一个图层则通过调用Markers.clearMarkers()方法清理掉该图层数据即可,待需要显示时再重新加载,即调用方法一即可。
//隐藏图层
	function hiddenMarker(markerName){
		if(markerName == 'cctv'){
			cctvMarkers.clearMarkers();
		}else if(markerName == 'tgs'){
			tgsMarkers.clearMarkers();
		}else{
			epsMarkers.clearMarkers();
		}
	}
三、搜索定位
搜索定位其实首先是从数据库中根据关键字查找出符合的结果项,然后再将这些结果根据坐标在GIS上进行渲染标注,当点击某一结果是进行定位;
我这里定位的实现是通过marker标注的定位图片的方式实现,这样做有个问题就是定位marker会覆盖方法一中设备的点击弹出事件,我这里用了最笨的方法就是定位标注时重新注册点击弹出事件。关键代码如下:
//gis定位并居中
	function deviceLocate(data){
		//alert(data);
		var url = 'jsp/gis/img/location.gif';
		var sz = new OpenLayers.Size(25, 30);  //尺寸大小
		var calculateOffset = function(size) {
			return new OpenLayers.Pixel(-(size.w/2), -size.h);
		 };
		var icon = new OpenLayers.Icon(url, sz, null, calculateOffset);
		var lonLat = new OpenLayers.LonLat(locationDataList[data].gis_x,locationDataList[data].gis_y);
		//google地图需要转换坐标
		lonLat.transform(map.displayProjection, map.getProjectionObject());
		locateMarkers.clearMarkers();
		//
		var popupContentHTML,popupClass;
		var title = '设备信息';
		if(locationDataList[data].device_type == '10'){
			title = '卡口';
		}else if(locationDataList[data].device_type == '11'){
			title = '电警';
		}else if(locationDataList[data].device_type == '12'){
			title = '治安监控';
		}
		popupContentHTML = createPopupContentHTML(title,locationDataList[data]);
		popupClass = OpenLayers.Popup.Anchored;
		addMarker(locateMarkers,icon,lonLat, popupClass, popupContentHTML,true);
		//locateMarkers.addMarker(new OpenLayers.Marker(lonLat, icon));
		//居中显示
		map.setCenter(lonLat, 4);
	}
四、新增标注
在GIS上添加新标注只需获取相应的经纬度坐标,保存志数据库即可。
init方法里增加
//单击事件
			var click = new OpenLayers.Control.Click();
            map.addControl(click);
            click.activate();
单机获取坐标函数
//单击事件响应
        OpenLayers.Control.Click = OpenLayers.Class(OpenLayers.Control, {
            defaultHandlerOptions: {
                'single': true,
                'double': false,
                'pixelTolerance': 0,
                'stopSingle': false,
                'stopDouble': false
            },

            initialize: function(options) {
                this.handlerOptions = OpenLayers.Util.extend(
                    {}, this.defaultHandlerOptions
                );
                OpenLayers.Control.prototype.initialize.apply(
                    this, arguments
                );
                this.handler = new OpenLayers.Handler.Click(
                    this, {
                        'click': this.trigger
                    }, this.handlerOptions
                );
            },

            trigger: function(e) {
            	markers.clearMarkers();
            	var url = 'gis/img/biaozhu.png';
    			var sz = new OpenLayers.Size(30, 30);  //尺寸大小
    			var calculateOffset = function(size) {
    				return new OpenLayers.Pixel(-(size.w/2), -size.h);
    			 };
    			var icon = new OpenLayers.Icon(url, sz, null, calculateOffset);
                var lonlat = map.getLonLatFromPixel(e.xy);
				marker = new OpenLayers.Marker(lonlat, icon);
				markers.addMarker(marker);
				//将墨卡托坐标转换成经纬坐标
				lonlat.transform(new OpenLayers.Projection("EPSG:900913"),
						new OpenLayers.Projection("EPSG:4326"));
                //坐标传回给父页面变量
				parent.gisx = lonlat.lon.toFixed(5);
				parent.gisy = lonlat.lat.toFixed(5);
            }

        });
以上几个功能对付简单GIS应用已经足够。
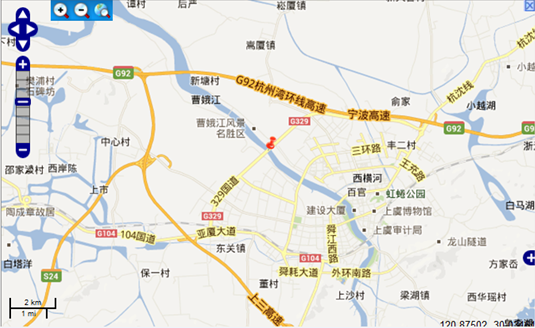
典型界面如下:


转载自:https://blog.csdn.net/linlzk/article/details/20049405